Take a screenshot:
A screenshot is basically just a picture of the contents on your monitor, or screen. There are two different ways to take a screenshot. The first way takes a picture of your entire screen and does not allow you to modify the area that is selected. In order to do this, hold down your Command key, hold down your shift key, then hit the number 3 key. This will automatically save the picture, or screenshot, to your desktop.
In order to take a screenshot and have the ability to "choose" what you want to take a screenshot of, hold down Command/Shift/4. At this point your cursor turns into a crosshair, and you can then click and drag over whatever area on the screen you want to take a picture of. Once you click and drag and then release the mouse you will hear a sound similar to a picture being taken - this tells you that the area you have selected for your screenshot has been captured and is now on the desktop.
These saved files are images, and can now be used just like you would use any image on a computer.
Upload an avatar to a webpage:
Upload a file to Google Docs:
Download a file saved in Google Docs:
Attach a file to Gmail:
Embed an image on a blog: The steps for embedding an image on your blog are as follows: >
- Go to Google images and search for an image you want to include on your blog (remember, this must be school appropriate)
- Click on the image that you need/want to open the image
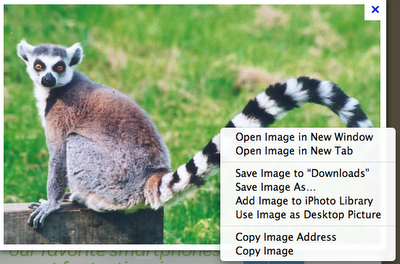
- Ctrl-click on the image so you get the drop down menu as seen to the right:
- Click on "Save Image As..."
- Save the image on your computer somewhere that you can easily remember
- Open your blog and create a new post
- Click on the Insert Image icon (shown by red arrow)
- Publish your post


Create a podcast using Vocaroo:
Using the website Vocaroo you can easily create a very simple podcast. Vocaroo is very simple to use and easy to understand, but very effective in helping you create your podcast.
Once you get to the website you are going to click on the button that says "Click to Record".
Next, you're going to see a window that pops up and asks to have permission to your microphone - choose "Allow".
You will then immediately be able to record your podcast - when you are done, click on "Click to Stop".
Once you have clicked on "Click to Stop" you will have several choices as to what you want to do. You can retry if you know that your podcast will not sound good, you can listen to what you have just created, or you can save your podcast if you are certain that the podcast you created is what you want.
Once you have created the podcast and it sounds like you want it to you will need to click on the blue link at the bottom that says "Click here to save>>". Once you click on this you will see a new window with a wide variety of options. For our purposes we need to click on EMBED so we can embed this on your blog. However, if you are doing this outside of class notice that you can Tweet it, add it to your MySpace or Facebook account, Gmail it, or copy the URL and use that as you see fit.
Once you click on EMBED you will see the HTML code - click in the box (this will automatically select all of the HTML code that you need), then copy what you have selected. Now you need to open your blog, create a new post titled "PODCAST", and copy your HTML code into the new blog post. Then publish your post.
Embed your Internet Safety movie on your blog:
- Log into your Xtranormal account
- Click on the "My Stuff" tab
- Click on your movie
- The click on where it says "< > Embed the Xtranormal player" (see image below)
- In the window that pops up, you want to choose a size of 480X270.
- In the Title bar type in your name and your partner's name. You do not need to include anything in the description bar.
- Click in the "Copy this code" box; it should select all of the text written there - copy it
- Open your blog and create a new post. At the top of the screen you will see where it says "Post title" - click on this. The post should be titled Internet Safety movie.
- Next, click on HTML (see image below). Then paste your copied code from the Xtranormal website.
- Once you have copied your HTML code, then you can click on the Publish button at the top of the page.
- Go to your blog - you should see your movie on your blog! If you see the HTML code you copied from the Xtranormal website then you did not click on the HTML button when you were creating your blogpost. You'll need to go back to step 8 and start over.


